


Stacking Adjustable Rings: Endless Style Options
The easiest way to build a ring stack is to start with fit, then keep the stack simple. I’d begin with one anchor ring, add 1–2 slim bands, and stop at 3 rings on one finger for most day-to-day looks.
Here’s the short version:
- Pick the base first: a plain band, a wider ring, or a stone ring
- Check fit before style: it should pass the knuckle with light resistance and stay put without deep marks
- Keep the stack light: 3 rings total is often enough for daily wear
- Use slim bands for spacing: 2–3 mm bands shape the stack; 1–1.5 mm bands work well as spacers
- Mix metals with a simple rule: let one metal make up about 60–80% of the stack, then add one accent metal
- Limit texture: don’t place more than two textured rings side by side
- Match the setting to the day: fewer, lower-profile rings for work; one statement ring for night
- Expect fit to shift by season: fingers can change by about half a size from winter to summer
I’d also keep comfort in mind. Smooth and hammered finishes tend to be easier for long wear, while pavé and high-prong rings need more care and are more likely to catch on clothing.
If you want one simple formula, use this: one anchor ring + two slim bands + small fit changes through the year. That gives you a stack that looks put together without feeling bulky.
How To Stack Rings: 5 Easy Tips For The Minimalist Or Maximalist | #stylewithsteph | KESTAN

sbb-itb-9da40c1
How to Choose Adjustable Rings Before You Start Stacking
Choose rings that layer well and can handle daily wear. Once you’ve got the fit right, the next step is building a stack that looks balanced instead of crowded.
Pick an Anchor Ring and Check the Fit
Start with an anchor ring. A wider band or a stone-set ring usually works best because it sets the scale for the rest of the stack and helps you decide where the slimmer bands should sit.
Fit that anchor ring first. It should pass over the knuckle with mild resistance, sit snugly at the base of your finger, and stay in place without spinning. If the anchor fits well, it’s much easier to choose supporting bands that don’t look too thin or too heavy next to it.
Choose Materials and Designs That Work Well Together
Sterling silver is more affordable, so it’s easier to build a larger stack without spending as much. The tradeoff is that it can tarnish when it comes into contact with lotion, cosmetics, or household chemicals.
18K gold resists tarnish better and keeps its color with little upkeep, which makes it a stronger pick for rings you wear every day.
To make the stack look pulled together, match the metal color, finish, and ring thickness. That way, the rings read as one look instead of a random mix.
Adjustable stacking rings with slim profiles and hidden resizing mechanisms tend to work best in layered stacks. They sit close to the finger and don’t draw attention to the adjustment point.
Finish matters, too, especially when rings sit side by side. A smooth polished band next to a lightly hammered one can add texture without making the stack feel messy. If you’re wearing high-prong rings, don’t place them right beside each other. Use a plain spacer band between them instead.
How to Build a Ring Stack Step by Step
Start With One Base Ring, Then Add Slimmer Bands
Once the fit feels right, build the stack from the anchor ring outward. Put the anchor ring on first, then add slimmer bands above it so the stack gets lighter as it moves up the finger. A leaf or infinity motif can work well as the main focal point.
After that, place 1–2 slim adjustable bands right above the anchor. Use 2–3 mm bands to give the stack shape, and use 1–1.5 mm bands as spacers between textured or stone-set rings.
A good place to start is 3 rings total on one finger before deciding if you want more. Odd-number groupings like 3 or 5 tend to look more deliberate, and three rings is often the best day-to-day balance before the stack starts to feel bulky or makes movement harder.
Use Adjustable Fit to Change Spacing and Finger Placement
The big draw of adjustable bands is simple: the same rings can give you very different looks. Here are three easy layouts:
- Compact vertical stack: Tighten each ring a bit so the bands sit close together with small, even gaps. This makes the stack read like one statement piece and works well for evenings out.
- Midi-ring placement: Loosen one adjustable band, slide it above the knuckle so it sits at the middle of the finger, then tighten it until it feels secure. This adds height and detail without piling more rings at the base.
- Multi-finger spread: Split slim bands across nearby fingers, like the ring, middle, and index fingers. This spreads out the weight, feels lighter, and tends to work well for long workdays or warm weather.
Any time you switch layouts, do a quick bend-and-flex test. Bend and straighten your finger a few times. If a ring presses into a joint or shifts in a way that feels off, widen it a little or move it above or below the joint.
Common Stack Layouts Compared
These three layouts cover the most common ways to wear adjustable rings.
| Layout | Typical rings | Comfort during movement | Styling flexibility | Best use case |
|---|---|---|---|---|
| Compact vertical stack | 3 (anchor + 2 slim bands) | Moderate; comfortable when the bands are thin and the fit is adjusted | High; allows texture and metal mixing on one finger | Evening events, curated daily looks, engagement ring stacks |
| Spread-out multi-finger stack | 3–5 rings across 2–3 fingers | High; less height per finger and more natural movement | Very high; supports asymmetry and mixed metals across the hand | Office days, casual weekends, warm-weather wear |
Once the layout feels balanced, you can start mixing metals and textures without making the stack feel crowded.
How to Mix Metals, Textures, and Motifs Without Overloading the Stack
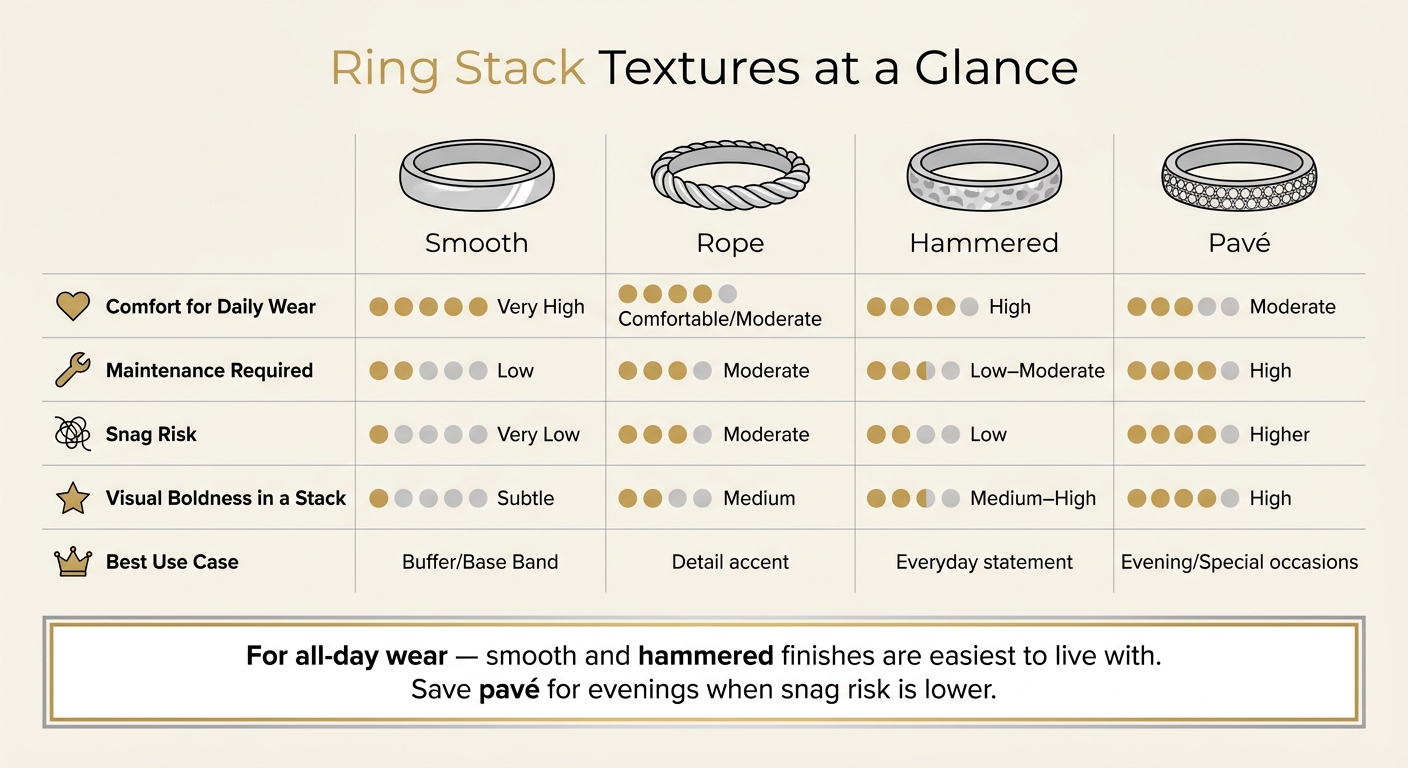
Ring Stack Textures Compared: Comfort, Maintenance & Daily Wearability
Combine Gold, Silver, and Contrasting Finishes on Purpose
Once your base stack is in place, metal and texture do the heavy lifting. They add contrast without making the stack feel bulky.
A simple rule helps: let one metal lead with about 60–80% of the stack, then use a second metal as the accent. That keeps the mix looking planned, not random. For example, three slim sterling silver adjustable bands paired with one 18K gold ring as the focal point feels clean and intentional. For casual outfits or office wear, keep the contrast quiet. For evening, you can push it a bit more and alternate metals with more confidence.
If you're trying to connect yellow gold and silver, rose gold can help tie the look together. Its warm pink tone sits comfortably between the two, which makes it a smart link when both metals show up in the same stack.
Balance Smooth Bands, Hammered Finishes, and Stone Details
Texture is where stacks can go wrong fast. Too much detail side by side, and the whole thing starts to feel busy.
A good guardrail: don't place more than two textured rings next to each other. Smooth bands work well as separators. Put a plain adjustable band between a rope-style ring and a pavé band, and each textured piece has room to stand on its own. There's a comfort angle too. Smooth rings slide more easily against neighboring bands during daily movement, which helps cut down on rubbing around delicate stone settings.
Stone-set rings usually do better when placed higher on the finger. Small stones and prongs can catch on knitwear or finer fabrics, so moving them higher - or wearing them on the middle finger instead of the index finger - can cut down on contact with sleeves and pockets during the day. A simple formula works well here: use one wide anchor ring, then build around it with slim bands.
Once the mix looks balanced, you can dial it up or down depending on where you're going.
Textures for Daily Wear and Visual Impact Compared
Use this chart to pick the texture that asks the least from you day to day.
| Texture | Comfort (Daily Wear) | Maintenance | Snag Risk | Boldness in a Stack |
|---|---|---|---|---|
| Smooth | Very high | Low | Very low | Subtle; best as buffers or base bands |
| Rope | Comfortable but tactile | Moderate; grooves trap lotion | Moderate | Medium; adds detail without overpowering |
| Hammered | High | Low–moderate; hides scratches well | Low | Medium–high; strong visual interest |
| Pavé | Moderate | High; stones and prongs need periodic checks | Higher | High; adds sparkle immediately |
For all-day wear - office days, errands, long workdays - smooth and hammered finishes tend to be the easiest to live with. Pavé, or rope and milgrain styles with heavier detail, make more sense for evenings or moments when snag risk is lower and the extra sparkle has a chance to show.
How to Style the Same Stack for Daily Wear, Work, and Special Occasions
Scale Your Stack Up or Down for Casual, Office, and Evening Looks
Once your core stack is set, the next step is simple: change the stack to match the setting. The same adjustable rings can feel laid-back, polished, or dressed up based on how many you wear and where they sit.
For casual days - errands, brunch, or weekend plans - keep things light. Two or three low-profile bands on your index and middle fingers usually feel easy to wear and don't get in the way. For this kind of look, skip stones.
For office wear, go a bit more restrained. One or two understated rings on your dominant hand usually works best. Flat or bezel-set designs are a smart pick because they're less likely to snag. Heading out after work? Add one focal ring instead of starting the whole stack over.
Evening and special occasions give you more room to dress it up. This is the time to add one statement ring. A moissanite or pavé-set adjustable ring on your ring finger, paired with two slim bands, tends to look balanced. The stone settings bring more shine, and if you're not typing all night or doing hands-on tasks, the extra height is much less of an issue.
How Seasonal Changes in the U.S. Affect Ring Fit
Fit changes with the weather too, so the same stack may need small tweaks during the year. Finger size shifts with temperature, and ring fit can change by about half a size between winter and summer.
Here's what that looks like in daily life: if your stack fits just right in February, it may feel much tighter by August. Winter often brings the opposite problem. Rings that fit well in summer can start to spin or slide when your fingers get slimmer. Adjustable rings make this easier to deal with. A slight loosening in summer and a small tightening in winter can keep the same stack secure all year without buying new sizes.
It's smart to test fit at two times of day:
- Morning, when fingers are often slimmer
- Late evening, when warmth and activity may cause mild swelling
A ring that fits well should slide over the knuckle with light resistance and sit snugly at the base without leaving a deep mark. Check the fit again at the start of summer and winter, then make small changes before the season fully shifts.
Satinski's adjustable stacking rings use a hidden mechanism that makes seasonal fine-tuning easier.
Conclusion: Build a Stack That Fits Well, Looks Balanced, and Feels Personal
Start with an anchor ring, then build around it with slim bands. Use the adjustable fit to fine-tune spacing and placement, and make small seasonal changes to stay comfortable through the year. A few well-chosen adjustable rings in sterling silver or 18K gold can take you from casual days to work to formal events without needing a different set for each.
FAQs
How tight should an adjustable ring feel?
An adjustable ring should feel snug and secure without hurting or leaving marks. It should stay put without slipping off or spinning too much.
At the same time, it shouldn’t feel too tight. A good fit moves with your finger and still feels comfortable as your fingers naturally swell or shrink during the day.
Can I stack rings on more than one finger?
Yes. Stacking rings on more than one finger can help your hands look balanced, add depth, and make your style feel more put-together.
With Satinski’s adjustable rings, it’s easy to switch rings from one finger to another or wear them across both hands based on your outfit, the occasion, or your mood. There aren’t any hard rules here, so you can mix things up and see what feels right.
Which ring textures are best for everyday wear?
For everyday wear, mix polished finishes with a few textured rings. Polished rings ground the stack and catch the light, while hammered or matte styles add depth and a bit of character.
A simple way to keep things balanced is the 70/30 rule: aim for about 70% smooth, polished rings, then bring in one or two textured pieces for contrast. That way, the stack feels put together, not crowded.


