


Care Tips for Hidden Adjustment Wedding Bands
A hidden adjustment wedding band lasts longer when I keep it clean, dry, gently adjusted, and checked on a set schedule. In most cases, 10–15 minutes of weekly cleaning, monthly fit and wear checks, and a jeweler visit every 6–12 months help cut down on stiffness, scratches, and mechanism trouble.
Here’s the short version:
- Clean it once a week with warm water, mild dish soap, and a soft microfiber cloth.
- Skip harsh cleaners like bleach, chlorine products, ammonia-heavy solutions, toothpaste, and baking soda.
- Never adjust it when wet and only move the mechanism in small steps.
- Take it off before workouts, swimming, gardening, cleaning, or putting on lotion.
- Store it alone in a dry, padded box or pouch, ideally around 65–75°F and 35–50% humidity.
- Check it each month for rough spots, bending, scraping, rattling, or fit changes.
- Stop using the adjustment feature if you feel grinding, see a crack, or notice loose stones.
If I had to boil the whole article down to one idea, it would be this: most problems start with buildup, moisture, or force. Keep those three under control, and the ring is more likely to stay smooth, secure, and comfortable.
This section gives a plain-English recap of the care steps that matter most, without repeating every detail from the full guide.
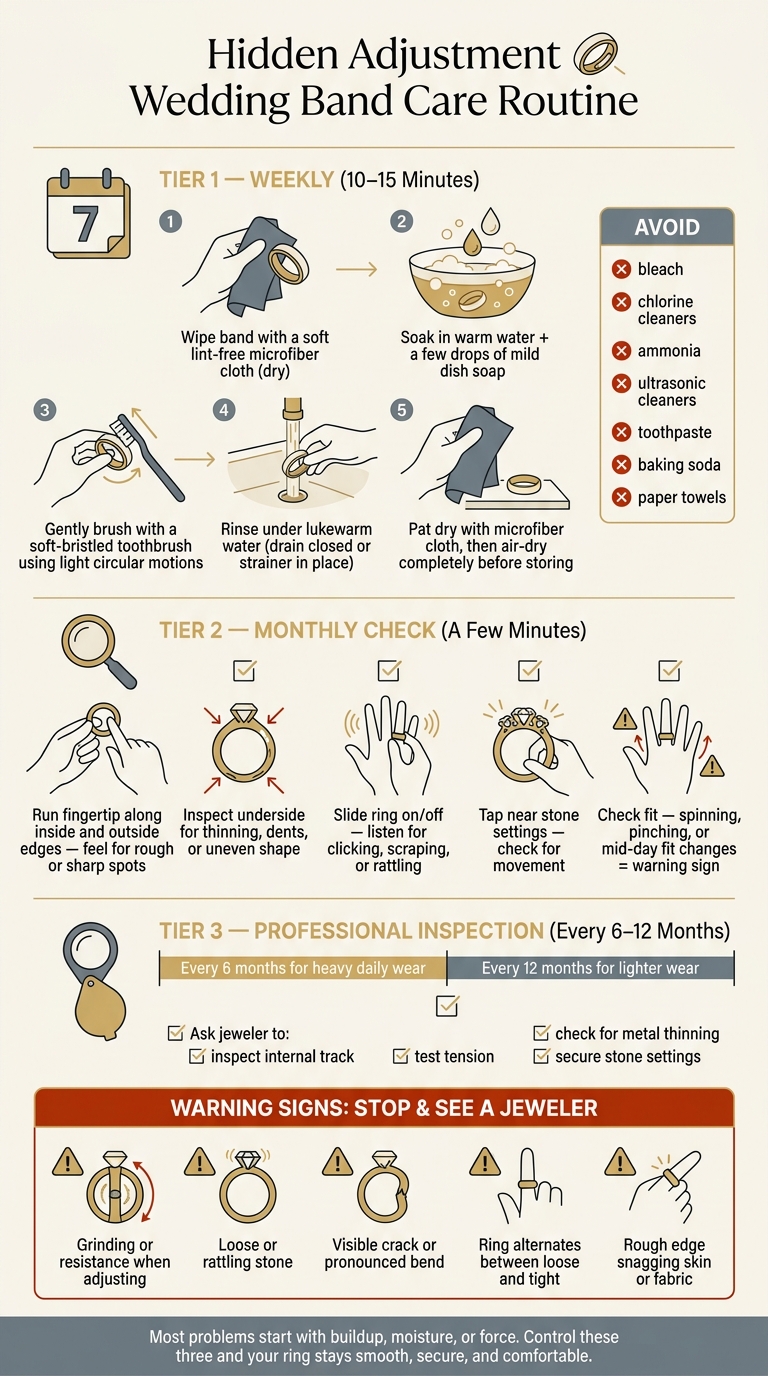
Hidden Adjustment Wedding Band Care: Weekly, Monthly & Annual Routine
Checklist: Clean the band without damaging the hidden mechanism
Clean the band once a week to remove soap, lotion, and skin oils before they build up inside the hidden channel.
Weekly cleaning steps
Set aside about 10–15 minutes each week. First, wipe the band with a soft, lint-free microfiber cloth to pick up surface oils before any water touches the ring. Then fill a small bowl with warm water - comfortable to the touch, not hot - and add a few drops of mild dish soap. Let the ring soak for a short time to loosen buildup inside the channel.
Next, use a soft- or extra-soft-bristled toothbrush that you keep only for jewelry. Brush with short, light circular motions around the band and along the underside. When you get near the adjustment area, go easy and keep the bristles on the surface.
Rinse the ring under lukewarm running water with the sink drain closed or a strainer in place. Pat it dry with a microfiber cloth, then let it air-dry before you wear it or put it away.
Keep the water warm, avoid sudden temperature changes, and do not adjust the ring while it is wet.
Cleaning products and tools to avoid
For regular care, stick with mild soap, warm water, and a soft cloth. Some everyday cleaning items can wear down the hidden mechanism over time.
Bleach and chlorine-based cleaners can pit the metal and corrode internal parts. Ammonia-heavy cleaners may strip protective coatings or react with mixed-metal pieces inside the adjustment channel. Ultrasonic cleaners should stay off the list unless a jeweler says the ring is safe for one, since they can loosen solder joints and put stress on small moving parts.
A few other items can also cause trouble. Paper towels and rough sponges can leave tiny scratches on polished surfaces and catch on fine details. Abrasive pastes - including toothpaste and baking soda - can get stuck inside the mechanism and make resizing feel gritty.
Once the ring is clean and dry, handle the adjustment feature with care during daily wear.
Checklist: Protect the adjustment feature during wear and resizing
How to adjust the band safely
Make small adjustments only and stay within the ring's stated adjustment range. If you push the mechanism past that limit, you can stress the internal parts and warp the band.
Before adjusting the ring, wash and dry your hands so you can hold it firmly. Work over a soft surface, like a folded towel, in case it slips.
Move the mechanism slowly and straight along its track. At the same time, support the band with your other fingers so it keeps its shape. Stop right away if the band looks misshapen, if you notice gaps near the hidden section, or if the hidden section feels scratchy.
For day-to-day resizing, use the manufacturer's adjustment range as your limit.
Daily wear habits that help prevent damage
Once the ring is clean and dry, a few simple habits can help keep the adjustment feature working smoothly.
- Remove the ring before cleaning, workouts, lifting, swimming, gardening, or applying lotion.
- Chlorine, sweat, and lotions can build up in the channel and make resizing stiff.
- Wipe the band with a soft cloth after wear to remove skin oils before they build up.
- When you take the ring off, store it in a dry, padded spot so the mechanism stays aligned.
sbb-itb-9da40c1
Checklist: Store the ring to prevent scratches, moisture, and fit issues
After you wear the ring, storage does a lot of the heavy lifting. It helps guard against moisture, scratches, and pressure. That matters because the hidden mechanism can be affected by pressure, humidity, and contact with other jewelry, even when the ring is just sitting in storage.
Best ways to store the ring at home and while traveling
At home, the main rule is simple: keep the ring separate and cushioned. A soft-lined jewelry box with individual compartments or a microfiber pouch helps stop the band from rubbing against harder pieces, like watches, gemstone rings, or chain necklaces. That kind of repeated contact can lead to micro-scratches and, over time, put strain on the part of the band that holds the adjustment feature. The bathroom is a poor place to store it because steam, humidity, and sudden temperature swings can make the mechanism feel less smooth over time.
The best storage environment is around 65–75°F and 35–50% relative humidity. A bedroom dresser or closet shelf is often a safe bet. If your home tends to be humid, place a small silica gel packet inside the jewelry box to help pull in extra moisture.
Before you put the ring away, especially after a long day, wipe it with a soft, lint-free cloth to remove skin oils. Then make sure it's fully dry. Moisture around the adjustment area can make the mechanism feel stiff. It's also smart to store the ring at a neutral size so the internal parts aren't under extra tension while it sits.
When you travel, use the same idea, just with a case that keeps the ring from shifting around. Travel adds more risk because the ring can end up loose in a bag or pocket. A padded travel case with individual ring slots in your carry-on works well. In a hotel room, use the in-room safe, but keep the ring inside its pouch or case even then so it doesn't slide around and hit the metal interior.
Use the quick guide below to match the storage method to the situation.
| Storage Situation | Recommended Approach | What to Avoid |
|---|---|---|
| At home (daily) | Soft-lined box or microfiber pouch, bedroom or closet | Open dish in bathroom or kitchen |
| Traveling | Padded travel case in carry-on, hotel safe with pouch | Loose in purse or suitcase pocket |
| Long-term storage | Individual slot, cool dry room, neutral ring size | Humid basements or attics |
Checklist: Check the band often and know when to get professional help
Cleaning and storage matter, but they’re only part of the job. Hidden parts inside the band can still wear down over time. That’s why it helps to do a quick check now and then. A few minutes can help you spot a small issue before it turns into a repair bill.
Even a well-made hidden adjustment band needs regular checks and careful handling.
What to check each month and every 6 to 12 months
A monthly self-check takes only a few minutes and can help you catch trouble early. Run your fingertip along the inside and outside edges of the band. You’re checking for rough patches or sharp spots. Then look at the underside for thinning, dents, flat areas, or a shape that no longer looks even.
Next, slide the ring on and off gently. Pay attention to how it feels and sounds. Clicking, scraping, rattling, or any catching can point to a problem. If the ring has stones, gently tap near each setting and see if anything moves.
If a ring suddenly starts spinning, pinching in one spot, or changing fit during the day, it may be losing tension. At that point, stop adjusting it at home and book a jeweler visit.
For professional inspections, plan on every 6 to 12 months. If the ring gets heavy wear, stay closer to 6 months. Ask the jeweler to check the internal track, test tension, look for thinning, and secure any settings.
If you notice any of these signs, stop adjusting the ring and move to a professional inspection.
| Warning Sign | What to Do |
|---|---|
| Grinding or resistance when adjusting | Stop adjusting; see a jeweler |
| Loose or rattling stone | Stop wearing the ring and have the setting secured |
| Visible crack or pronounced bend | Do not attempt to bend it back; get professional repair |
| Ring alternates between loose and tight | Schedule a mechanism inspection |
| Rough edge snagging skin or fabric | Have a jeweler smooth and inspect the area |
Conclusion: Small care steps that help the most
Clean gently, adjust with care, store the ring separately, and inspect it on a regular basis. Those four habits help the hidden mechanism keep working smoothly and help the band stay comfortable for years of daily wear.
FAQs
How do I know if I’m over-adjusting the band?
Pay attention to how the mechanism feels. It should move smoothly and stay consistent, without grinding, clicking, sticking, or any rough spots. If it doesn’t, you may be forcing the band or putting stress on the parts inside.
Take a look at the ring’s shape too. A well-kept band should remain perfectly round. If you fidget with it all the time or resize it over and over, the metal can weaken as time goes on.
Can humidity affect the hidden adjustment mechanism?
Yes. High humidity can affect the hidden adjustment mechanism in your Satinski wedding band.
It can speed up tarnish, especially on sterling silver, and it may also make the inner parts move less smoothly over time.
To help protect your ring, keep it in a cool, dry spot like a dresser drawer or jewelry box. Try to avoid damp places such as bathrooms and kitchens, where moisture tends to hang in the air.
What signs mean the ring needs professional repair?
Seek professional repair if you notice mechanical failure or structural damage during inspections.
That includes issues like:
- Grinding, clicking, or resistance in the adjustment mechanism
- Bending, warping, thinning metal, or a ring that's no longer round
- Loose settings, gaps, misaligned parts, bent prongs, or stones that feel insecure


