

Designing Matching Rings for Two Very Different Hands
Matching rings do not need the same size, width, or build to look like a pair. I’d keep 2–3 shared details the same - like metal, finish, motif, stone shape, or engraving - then size each ring for the hand that will wear it.
Here’s the short version:
- I’d measure each person’s finger base and knuckle
- I’d check size on two normal days at about 68–72°F
- I’d plan for daily swelling of about 0.25–0.5 U.S. ring sizes
- I’d keep shared design details the same
- I’d change width, thickness, stone scale, profile, and fit method for each hand
- I’d test comfort during normal tasks before making the set final
Put simply: match the look, not the measurements.
A few numbers matter early. Bands under about 1.5 mm are more likely to bend with daily wear, while 1.6–2.0 mm is a common range for day-to-day use. For stone scale, a stone that sits at about 60%–70% of the finger width at the ring base will often look in proportion. And if one ring is much slimmer than the other, it can still look paired when it’s about 1/2 to 2/3 the width of the larger ring.
If I were planning a pair for two very different hands, I’d focus on three things first:
- Fit: base size, knuckle size, swelling, and comfort
- Proportion: band width, thickness, stone size, and profile
- Linking details: metal, finish, pattern, or engraving
| Area | What I’d keep the same | What I’d change |
|---|---|---|
| Visual match | Metal, finish, motif, engraving, stone shape | Overall ring scale |
| Fit | General design theme | Ring size, interior shape, fit method |
| Proportion | Style direction | Width, thickness, setting height, stone size |
So the main idea is simple: one ring can be narrow and quiet, the other can be bolder, and both can still belong together. The set works when the outside details connect and the fit is built for each hand.
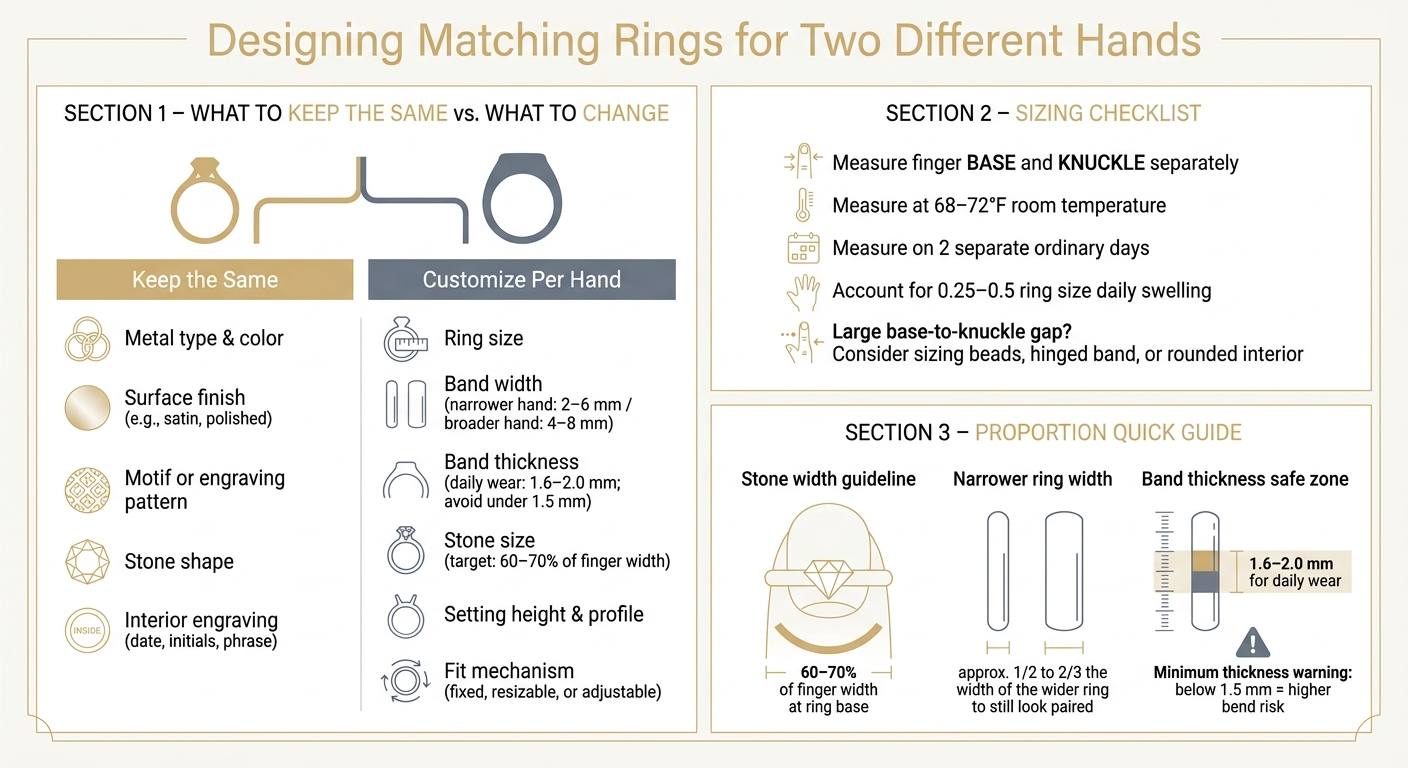
How to Design Matching Rings for Different Hands: Key Proportions & Shared Details
Assess Each Hand Before Choosing a Ring Design
Start by measuring both hands before you lock in any design details. Keep the numbers for each hand separate. That small step helps protect two things that matter a lot: how the rings look and how they feel once they're worn every day.
Measure Finger Size, Knuckles, and Daily Fit Changes
Always measure the finger on the hand where the ring will be worn. For each person, take two measurements:
- the finger base, where the ring will sit
- the widest part of the knuckle, which the ring has to pass over
If those numbers are noticeably different, the ring needs to slide over the knuckle without feeling loose at the base. That kind of fit may call for a rounded interior or an adjustable band. Put simply, these measurements show where the ring can stay consistent and where it needs to change.
Take measurements at room temperature, ideally 68–72°F. Skip sizing right after exercise, a hot shower, or time in the cold. Heat can make fingers swell by about a quarter size, so it's smart to measure on two separate ordinary days and compare the results.
That way, you're not mistaking a short-term size swing for a fit issue.
| What to measure | How to check it | Why it matters |
|---|---|---|
| Finger-base circumference | Flexible ring sizer or professional sizing gauge at the base of the intended finger | Sets the core U.S. ring size for each wearer |
| Widest knuckle circumference | Same sizer at the joint the ring must cross | Determines clearance needs and whether an adjustable feature is warranted |
| Base-to-knuckle difference | Compare both measurements | Large gaps may require sizing beads, a hinged mechanism, or a rounded interior |
Use the base and knuckle numbers to decide whether both rings can share the same profile or whether each one needs its own fit system.
Review Hand Proportions, Lifestyle, and Jewelry Habits
Once fit is clear, look at proportion. The ring should suit the hand that's going to wear it. A narrow or short finger can look swallowed by a wide band. A broader or longer finger can often handle more width with ease. Use those proportions to guide band width, stone scale, and profile. This is often where you decide what the two rings will share and what should be scaled for each person.
Daily life matters just as much as finger shape. If someone lifts weights, works with tools, or wears gloves a lot, a lower-profile setting and a durable finish may make more sense. If they stack rings, the band should sit neatly next to the pieces they already wear. It's also smart to note each person's metal preference. If the metals don't match, you can still tie the pair together through engraving, stone shape, or finish instead of making them identical.
If the measurements are far apart, the knuckle is much larger than the base, or the design includes delicate settings, ask a professional jeweler to confirm the final size.
sbb-itb-9da40c1
Choose Shared Design Elements and Adjust the Proportions
Pick the Visual Details That Stay the Same
Start with two or three shared anchors - metal, finish, pattern, or engraving. Then let the proportions shift for each hand. Width, thickness, stone size, and profile don't need to match one-for-one.
That's the key idea: the rings should look like they belong together, even if the hands are very different in size. If the two people like different looks, keep the common thread in the metal, finish, or motif, and change the silhouette. Then scale each ring for the person wearing it.
For example, both rings might use 14K yellow gold, a satin finish, and an engraved geometric line. One ring can stay narrow and quiet, while the other can go wider and more bold. They still read as a pair because the visual language stays the same.
Matching interior engraving - such as initials, a date, or a short phrase - adds a private point of connection without changing the outside of the ring.
Scale Width, Thickness, Stone Size, and Profile for Each Hand
Once the shared details are set, size each ring on its own terms. A narrower band can still feel connected to the wider ring when it is about one-half to two-thirds the width of the wider band. For daily wear, a practical thickness range is 1.6–2.0 mm, and bands thinner than about 1.5 mm are more likely to bend under daily pressure.
As a rough guide, bands often land around 2–6 mm on the narrower end and 4–8 mm on the wider end, but those are just starting points, not rules. Finger length, finger breadth, and plain comfort should drive the final choice.
Width changes how heavy a ring looks. Thickness changes how it feels and how well it holds up.
Use the same design code, then scale each part to suit the hand wearing it.
| Design feature | Smaller or narrower hand | Larger or broader hand |
|---|---|---|
| Band width | Narrower band | Wider band |
| Band thickness | Sufficient thickness for daily wear without bulk | Equal or increased thickness where needed |
| Stone size | Smaller center or accent stones | Larger center stone or more substantial arrangement |
| Setting height | Low profile for comfort and fewer snags | Height adjusted for stone size and preferred presence |
| Motif scale | Finer pattern, smaller engraving, or fewer repetitions | Larger or more widely spaced version of the same motif |
| Profile | Rounded or comfort-fit profile | Flat, rounded, or beveled matching silhouette |
Stone size works the same way. A useful guide is to keep the stone width at about 60% to 70% of the finger width at the ring base. A wider band can carry a larger stone more naturally. A narrower band usually looks better with a smaller stone of the same type.
To keep the pair tied together, match the gemstone type or color instead of trying to match carat weight. For example, both rings could use round blue sapphires, with a 6 mm center stone in one ring and a 4 mm center stone in the other. That keeps the connection clear without forcing the stones to be equal in size.
Once the proportions are set, choose the fit system that makes the larger sizing gap wearable.
Choose the Right Fit System and Build the Pair
When to Use Fixed, Resizable, or Adjustable Rings
Once width and profile are set, the next step is choosing the fit system that deals with the gap between the base of the finger and the knuckle.
A fixed-size ring is the best pick when the wearer’s finger size stays fairly steady, the band has a simple structure, and the ring is meant to stay put.
Go with a professionally resizable ring when the metal can be resized cleanly and the design can handle a small change. That said, not every ring plays nicely with resizing. Bands with stones all the way around, delicate pavé, heavy engraving, very thin bands, or settings that are already under stress may not resize well. After resizing, test the ring during normal movement before you approve the final pair.
An adjustable ring makes sense for daily swelling or a large gap between the knuckle and the base of the finger. Common styles include open bands, wrap styles, sliding systems, and hidden adjustment mechanisms. Make changes in small increments. If you bend the ring too forcefully again and again, you can warp the band or damage the mechanism.
If you want an adjustable ring that doesn’t look adjustable, a hidden mechanism is a smart option. It keeps the outside shape looking clean and lets the wearer make small fit changes at home.
The two rings in a pair don’t have to use the same fit system. One person might wear a fixed narrow band in 18K gold, while the other wears a wider band in the same metal and finish with a hidden adjustable mechanism. On the outside, they can still look like a matched set.
Test Comfort, Movement, and Security Before Finalizing
A ring can feel fine for two minutes in a store and still be wrong later. That’s why fit needs to be checked during actual movement, not just while someone is standing still.
Before approving the final pair, run through these checks:
- Compare the shared anchors side by side - Hold both rings together in natural light and confirm that the metal color, finish, engraving placement, or stone shape matches the plan.
- Test each ring on its own - It should slide over the knuckle with slight resistance, then sit at the base of the finger without pinching.
- Make a fist and flex the fingers - The ring shouldn’t dig into the skin or get in the way.
- Try everyday tasks - Type, grip a cup, open a door, handle keys, and put the hand into a pocket or glove.
- Check rotation and security - A little movement is normal, but if the ring spins a lot, snags, or feels like it might slip off, it’s too loose.
- Wear the rings for a few hours - It helps to test them at different times of day, since fingers swell naturally. Then check again for pressure points or skin irritation.
If the fit is only slightly off, a small fix can often solve the problem without changing the overall look. A loose fixed ring may need sizing beads or another interior stabilizer. A ring that rubs can often be improved by softening the edges or smoothing the inside finish. If a ring spins too much, the fix may be as simple as adjusting the size, adding a stabilizer, lowering a top-heavy setting, or changing the band profile. An adjustable ring may just need a minor mechanism tweak, but don’t keep bending it at home if the design is delicate or has stones. The goal is simple: keep the shared design intact while making the fit work.
Matching Ring Plans and Final Takeaways
Simple Ways to Match Rings When Sizes and Styles Differ
Once you’ve picked the right fit system, the next step is making the pair look like they belong together. The easiest way to do that? Choose two or three shared details, then adjust the rest for each person’s hand.
| Matching Strategy | What Stays the Same | What Changes | Works Best When |
|---|---|---|---|
| Same motif, different widths | Engraved pattern, texture, or carved line | Band width and motif scale | Finger sizes differ noticeably |
| Same metal, different stone scale | Metal color, stone shape, setting style | Stone size or number of stones | Style preferences differ |
| Coordinated stacking rings | Metal, finish, and recurring detail | Number of bands and individual sizes | One person prefers layered styling |
| Fixed and adjustable pair | Metal, motif, or interior engraving | Fit mechanism and size range | One wearer's finger size changes daily |
| Shared engraving, different profiles | Interior date, initials, or phrase | Exterior curvature and edge shape | Comfort needs or aesthetics differ |
That table shows the basic idea: keep the design language shared, not identical. In plain terms, both rings should feel related, even if they aren’t twins.
A few easy ways to apply that:
- Keep the motif’s shape and spacing the same, but change its size
- Match the stone shape and metal, not the carat weight
- Use the same interior engraving if the outer shape needs to change for comfort
This approach works well because it gives you room to adjust width, profile, and scale without losing the connection between the two rings.
Conclusion: Keep the Shared Design, Customize the Fit
Start with each person’s hand. Measure carefully, choose the shared details, then adjust the width and profile to suit the wearer. After that, pick the fit system and test for comfort and security.
Visual matching comes from shared choices like metal, finish, motif, stone shape, or engraving. Physical matching comes from changing things like width, thickness, stone scale, profile, and fit system.
Put simply: match the design first, then shape the fit around each hand.
FAQs
Can matching rings use different metals?
Yes. Satinski matching rings can use different metals and still look intentionally paired.
For example, adjustable pairs come in sterling silver, gold vermeil, or 18K gold. Even when the metals differ, the rings still feel connected thanks to shared design details and comfort-focused resizable mechanisms that help keep the fit and overall look aligned across two different hands.
What if my knuckle is much larger than my finger base?
If your knuckle is larger than the base of your finger, a fixed-size ring usually needs to be large enough to slide over the knuckle. The trade-off is simple: once it’s on, it can feel loose at the base and may spin around more than you’d like.
A resizable band solves that problem in a pretty direct way. It opens enough to get past the knuckle, then closes down for a snugger fit where the ring actually sits. If you plan to adjust it often, 14K solid gold is the better pick because it holds up better to repeat changes.
How do we match rings if our styles are very different?
If your tastes don’t match exactly, aim for shared design cues instead of identical rings. Pick pieces that line up through similar motifs, metal types, or gemstone settings, then tweak the width, profile, or stone size so each ring fits the wearer’s hand well.
Satinski’s adjustable rings can help you keep that matched look across different finger shapes and sizes. And if you want something more personal, custom orders can bring both styles together in one wearable set.


