


How Custom Ring Design Actually Works: Start to Finish in 8 Steps
A custom ring is mostly about decisions made before the ring is made. In my view, the process is simple when you break it down: decide the ring’s job, pick metal and stone, review the design, confirm fit, sign off on specs and timing, move into production, check the final piece, and then care for it after delivery.
Most orders take 4 to 6 weeks, though some can run 4 to 16 weeks depending on the design. I’d plan at least 2 to 3 months ahead if the ring is for a proposal, wedding, or gift date. Up front, I’d bring 3 to 10 photos, a budget, my ring size, band width, and a target delivery date.
Here’s the whole process in plain English:
- Step 1: Decide the ring’s purpose, style, and comfort needs
- Step 2: Choose metal, stone, and any fit option like an open, hinged, or sliding band
- Step 3: Review sketches or CAD and ask for changes
- Step 4: Test size, width, height, and daily comfort with a model or sample
- Step 5: Approve the final design, written specs, payment, and timeline
- Step 6: Casting, fit-feature build, stone setting, and finishing work
- Step 7: Final checks for size, stone security, surface finish, and mechanism function
- Step 8: Delivery, home care, and jeweler checkups every 6 to 12 months
A few numbers stand out. Many rings need 2 to 4 CAD rounds before approval. Finger size can shift by about 1/4 size day to day and about 1/2 size by season. Deposits often land around 30% to 50% of the total price.
If I had to sum it up in one line: the best custom ring process is clear, written, and checked twice before production starts.
| Part of the process | What I’d focus on |
|---|---|
| Planning | Photos, budget, size, wear needs, date needed |
| Design | Metal, stone, setting, band width, ring height |
| Fit | Knuckles, swelling, comfort, daily use |
| Approval | CAD, measurements, engraving, payment, timeline |
| Production | Casting, setting, polishing |
| Final check | Size, finish, stone tightness, moving parts |
| After delivery | Cleaning, storage, inspection schedule |
That’s the full path at a glance, without the guesswork.
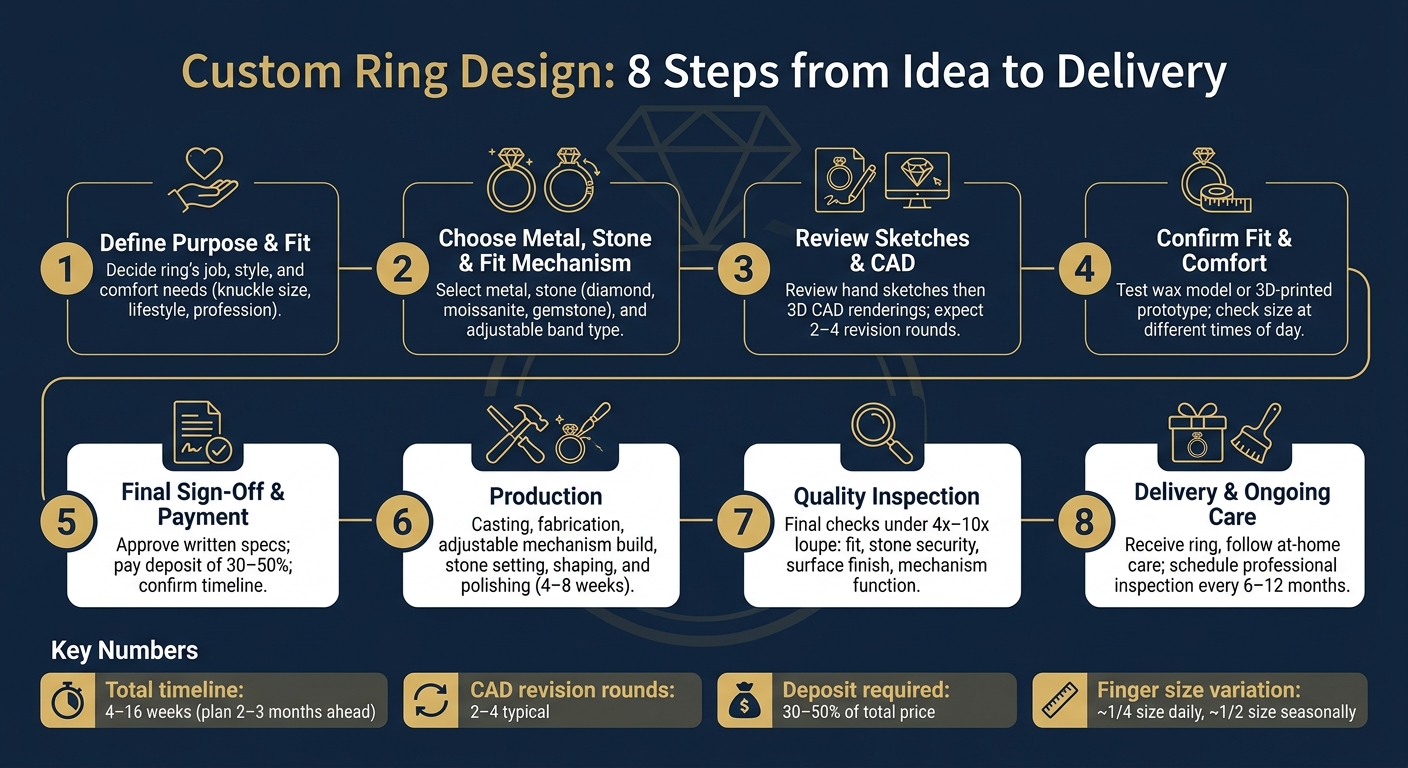
Custom Ring Design Process: 8 Steps from Idea to Delivery
Steps 1 to 3: Idea, Consultation, and Design Development
Step 1: Define the Ring's Purpose, Style, and Fit Needs
Start with the job the ring needs to do: engagement, wedding, stacking, or daily wear. That one choice shapes a lot. It affects durability, setting style, and even which stone makes sense.
It also helps to build in personal details early. An engraving, initials, or a small motif will sit better in the design if it's part of the plan from day one. That detail can stay hidden inside the band or sit out in the open if you'd rather make it part of the look.
Fit matters just as much as style. Some fingers change size with heat, cold, swelling, or large knuckles. A nurse who wears gloves all day, for example, may need a low-profile bezel-set ring with a smooth band so it doesn't catch. That kind of day-to-day detail can change stone height, setting style, and band profile before the design work even starts.
Once the purpose and fit needs are clear, the consultation gets much more focused.
Step 2: Use the Consultation to Choose Metal, Stone, and Fit Mechanism
The consultation is where ideas turn into actual choices.
Pick the metal based on wear, upkeep, and budget. Sterling silver usually costs less. Gold gives you a good mix of strength and appearance. Platinum is known for strong stone-setting security and hypoallergenic wear. For stones, think about hardness, sparkle, and price. Diamond is the hardest. Moissanite gives strong sparkle for the money. Colored gemstones shift the whole look of the ring.
If you're considering an adjustable ring, the fit mechanism needs to match how much your finger size changes. Here's a side-by-side look at the three main options:
| Adjustable Mechanism | Comfort | Appearance | Ease of Use | Best For |
|---|---|---|---|---|
| Open shank | Good for minor adjustments; can feel slightly less secure if opened wide | Slight visible gap at the back | Squeeze or widen by hand; very simple | About 1 to 2 US sizes of fluctuation; casual or stacking rings |
| Hinged shank | High comfort once closed; passes over large knuckles, sits snugly | Nearly identical to a solid band when closed | Simple closure; easy after brief instruction | Large knuckles; engagement and wedding rings |
| Sliding band | Smooth micro-adjustments; even pressure around the finger | Mechanism integrates cleanly into the design | Sliding mechanism; often easier for frequent small changes | Frequent small size changes (e.g., US 6–8); long-term wear, pregnancy, chronic swelling |
If your size changes a lot, say exactly when it happens. Hot weather, exercise, long flights, pregnancy, or arthritis can all matter. Those details help the designer point you to the right mechanism and size range. If sample rings or demos are available, try them. A mechanism can look fine on paper and still feel off once it's on your hand.
After the metal, stone, and fit mechanism are chosen, the design moves into sketches and CAD.
Step 3: Review Sketches or CAD Renderings and Request Changes
After the consultation, the design team will usually make hand sketches first and then 3D CAD renderings. Sketches show the overall layout. CAD gets into exact proportions, band width, stone size, and setting height from different angles, often with millimeter measurements.
This is the point to get picky. Small changes can make a big difference. For instance, a buyer may feel that a 2.5 mm band looks too slight next to a large center stone and ask to move it to 3.0 mm for better balance and support. CAD also shows how an adjustable feature sits inside the ring. You can spot whether a hinged shank or sliding part adds bulk or blends into the profile.
Most custom rings go through two to four CAD rounds before final approval, so it's smart to expect at least one round of edits.
This is also the last low-cost point to make changes. Check the dimensions, angles, and proportions with care. It often helps to compare the CAD to a ring you already own so the scale feels more real. Once you approve the CAD, the ring moves into production.
After the final CAD revision, the design moves to sizing approval and production.
sbb-itb-9da40c1
Steps 4 to 6: Fit Approval, Final Sign-Off, and Production
Step 4: Confirm Sizing, Comfort, and Wearability Before Approval
Once the CAD is approved, the next step is simple: make sure the ring feels right on your actual finger.
A ring can look perfect on a screen and still feel off in daily wear. That’s why many jewelers use a wax model, 3D-printed resin prototype, or sample band before casting. This lets you check the ring’s size, band width and thickness, interior profile, and overall feel on your hand.
Try the prototype at different times of day and during normal daily activity. Finger size can shift by about a quarter size day to day and about half a size seasonally. So a ring that fits well in the morning might feel tighter later on. If you deal with arthritis, swelling, or enlarged knuckles, this step matters even more. The ring should pass over the knuckle without a fight, sit at the base of the finger with a secure feel, and avoid twisting, pinching, or catching when you move your hand.
Also check the interior profile and the height of any center stone. Comfort-fit bands have a rounded inner edge, so they can feel different from standard-fit rings. Higher settings can snag on clothing or rub against nearby fingers. If anything still feels uncertain, now is the time to adjust the size, interior profile, or band width before approval.
Once the prototype feels right, the jeweler can lock the design for production.
Step 5: Approve the Final Design and Confirm Timeline and Payment
After the fit is approved, the final sign-off should cover more than just the look of the ring. It should include the CAD renderings, technical specs, and written job sheet.
Check each detail closely:
- Metal type and purity
- Exact stone details
- Setting style
- Finish
- Engraving text and placement
- Agreed ring size or adjustable range
Put all of this into a written design confirmation. The CAD images should show millimeter measurements for the band, stone height, and other key dimensions. That written record can save a lot of back-and-forth later.
For payment, many jewelers ask for a non-refundable deposit of 30% to 50% of the total price in USD to start production. The rest is usually due before shipment. Changes after approval, like switching the metal color, changing the setting, or swapping stones, often add cost and may slow down the order because they can require new CAD work or extra labor.
From final approval to shipment, production usually takes 4 to 8 weeks.
Give yourself more time than you think you need. Starting the custom process at least 2 to 3 months before a proposal, wedding, or anniversary gives you breathing room for revisions and shipping.
Step 6: Casting, Adjustable Construction, and Stone Setting
Once you approve the design, production begins. The approved ring is cast or fabricated in metal, then cleaned and prepared for setting.
If the ring has an adjustable or resizable feature, that part is built at this stage. The idea is straightforward: the ring should open enough to get over the knuckle, then sit more securely at the base of the finger without feeling loose.
Next comes stone setting. The jeweler places the stones, tightens the prongs or bezels, and shapes the band to its final size and finish. The shank base, stone supports, and prong tips usually see the most wear.
After setting, the ring moves on to polishing and final quality checks.
Steps 7 and 8: Final Inspection, Delivery, and Long-Term Care
Step 7: Polishing, Quality Checks, and Size Verification
Once the ring is set, the maker gives it one last close look against the approved design before it ships. After setting, the ring is polished and checked. Any small surface flaws left from casting are removed, and the piece is brought to the approved finish, whether that's high gloss, matte, or textured. For white gold designs, rhodium plating is often added at this stage to bring back a bright white look.
The inspection happens under magnification, often with a 4x to 10x loupe, so tiny problems don't slip through. The final review usually comes down to four core checks:
| Checkpoint | What's Checked | Issue It Prevents |
|---|---|---|
| Fit & Size | Ring verified on mandrel against the approved U.S. size | Ring too tight, too loose, or unable to adjust correctly |
| Stone Security | Every stone tested with gentle lateral pressure and a light tap test | Stones shifting or falling out after delivery |
| Finish Quality | Surface inspected under magnification for scratches, pits, or uneven polish | Dull appearance, rough edges, or visible tool marks |
| Mechanism Function | Adjustable or hinged parts tested for smooth operation and durability | Mechanism failure or breakage during use |
This last pass makes sure the size, setting, and mechanism all match what was approved before production began.
Step 8: Delivery, At-Home Adjustment Guidance, and Ongoing Care
After inspection, the finished ring is packed and shipped with care instructions. When it arrives, try it on in good light and compare the design, fit, and finish with the approved version. If the ring includes an adjustable mechanism, use the provided tool only for minor adjustments. Don't bend the band, pry the setting, or try to resize the ring at home.
Day-to-day care helps the ring keep the same fit and comfort worked out earlier in the process. Clean it on a regular basis with warm water, a few drops of mild dish soap, and a soft toothbrush. Pay extra attention to the area under the stone and around the prongs, since oil and debris tend to build up there. Rinse it over a closed drain, dry it with a lint-free cloth, and store it in a soft pouch or lined box away from moisture.
Set up a professional inspection at least once a year, or about every six months if you wear the ring every day, so a jeweler can check prong tightness, stone security, band wear, and any moving or adjustable parts. For white gold rings, rhodium replating is usually needed every one to two years, and prong retipping every five to ten years. If you notice a stone clicking or wiggling, a prong looking uneven, or the mechanism no longer moving smoothly, contact the jeweler right away instead of waiting for the next inspection.
Making A Custom Engagement Ring How It's Made From Start To Finish - Custom Ring Maker
Conclusion: The 8 Decisions That Make a Custom Ring Work
Put all eight steps together, and one thing becomes clear: a custom ring works best when the big decisions are made before casting. That includes purpose, style, fit, metal, stone, and finish. Making those calls early helps avoid expensive changes later and keeps the ring matched to the way it’ll actually be worn.
The best custom rings balance meaning with day-to-day comfort. CAD review, sizing checks, and final inspection help confirm the details before production wraps up, including proportions, stone placement, band thickness, symmetry, and comfort.
The end result is a ring built around the wearer, the story behind it, and daily use. That’s what makes the custom process worth the time.
FAQs
What should I bring to a custom ring consultation?
Bring inspiration that shows your taste, like images, sketches, or photos of designs you love. You should also come ready to talk about what you like in metals, gemstones, engravings, and personal symbols.
It helps to share a bit about your day-to-day life too. Your work, hobbies, and routine can shape choices like durability, band thickness, and how secure the setting needs to be. And yes, it’s smart to walk in with a clear budget in mind.
How do I know if I need an adjustable ring design?
An adjustable ring design can make life a lot easier if your finger size changes with temperature, weight shifts, pregnancy, or aging. It can also work well if arthritis or enlarged knuckles make a fixed-size ring hard to wear comfortably.
It’s also a practical pick if you want to avoid resizing costs, long wait times, or the risk of changing the ring’s structure. And if you’re buying a surprise gift and don’t know the exact ring size, an adjustable ring gives you a bit more breathing room.
Can I make changes after I approve the CAD?
The CAD stage is the best point to make changes before final production starts. If you want to tweak the design, do it during the design and modeling phases. Once the ring moves into casting and production, your options get much tighter.
It also helps to confirm the revision policy with your designer early on. Ask how many changes are included and whether those edits could affect the timeline.


